From: https://medium.com/better-programming/understand-how-view-renders-in-android-763f0adfb95c
In this article, we’re going to see an overview of how the view we created in XML gets rendered on the screen in pixels.
Making a great-performing app is only possible by knowing what’s going under the hood. If you don’t know what the hardware is doing, you have a chance of using it poorly. Before exploring rendering, let’s learn the basics regarding the life cycle of a view.
Life Cycle of a View
If you have an idea of the life cycle of a view, you can skip this section.
Many of us aren’t aware views have a life cycle, but it’s very important to know the life cycle of a view while building custom views and better-performing apps. Please check out the image below.
Each method of the view has a specific purpose to serve. Let’s dive into the details of a few methods that are required to know for now. onMeasure() is a method called to determine the size requirements for this view and all of its children. onLayout() is a method called when this view should assign a size and position to all of its children. onDraw() is called when the view is ready to render its content.
I’m not going to go into detail about every method. For more details, check out this article.
Rasterization
Rasterization i a process of taking some high-level objects like strings, buttons, or shapes and turning them into pixels in the texture on our screen.Rasterisation is a very time-consuming process. So GPU (Graphics Processing Unit) comes into the play to accelerate the rasterization process. GPU is designed in a way to use only specific types like polygons, textures, etc.
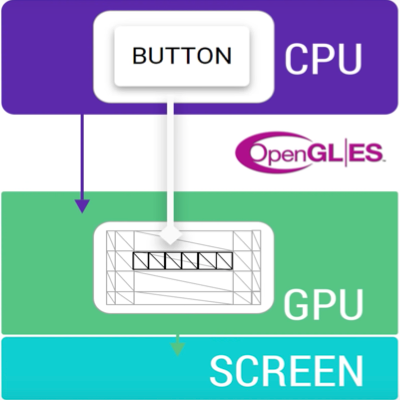
CPU is responsible for feeding the content to the GPU before it can draw anything to your screen.

This process of transferring data from CPU to GPU is done by a common API called OpenGL ES. At any point in time, UI objects, like buttons, paths, etc., need to be drawn to the screen. Firstly, they’re turned into polygons and textures by the CPU, and later they’re passed to the GPU to rasterize.
Example
Let’s take a simple example of rendering a button on the screen. So here the button or any other UI objects are first needed to be converted into polygons and textures by the CPU before feeding it to the GPU.
This process of converting UI objects into mesh is very time-consuming. And after conversion, the process of uploading this information from CPU to GPU via OpenGL ES API is also a time taking process.
These operations aren’t that easy. As the OpenGL ES uploads the content into the GPU, the mesh which was the representation of a UI object stays on the GPU. So in the future, if you’re going to want to draw the button again on the screen, we’ll need to reference the mesh already there and tell OpenGL ES how to draw.
Tip: Optimising for rendering performances means getting as much data as possible onto the GPU and leaving it there and referencing it as long as possible without modifying.
Display List
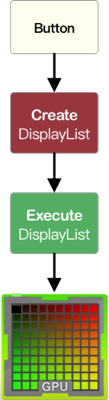
When a view needs to be rendered, a display list is created for that view. When that view needs to be rendered to the screen we need to execute that display list by submitting its drawing commands to the GPU.
The display list holds all the information for rendering the view on the GPU. It may contain the GPU’s assets that may be needed or the commands needing to be executed for two OpenGL to render it one at a time.
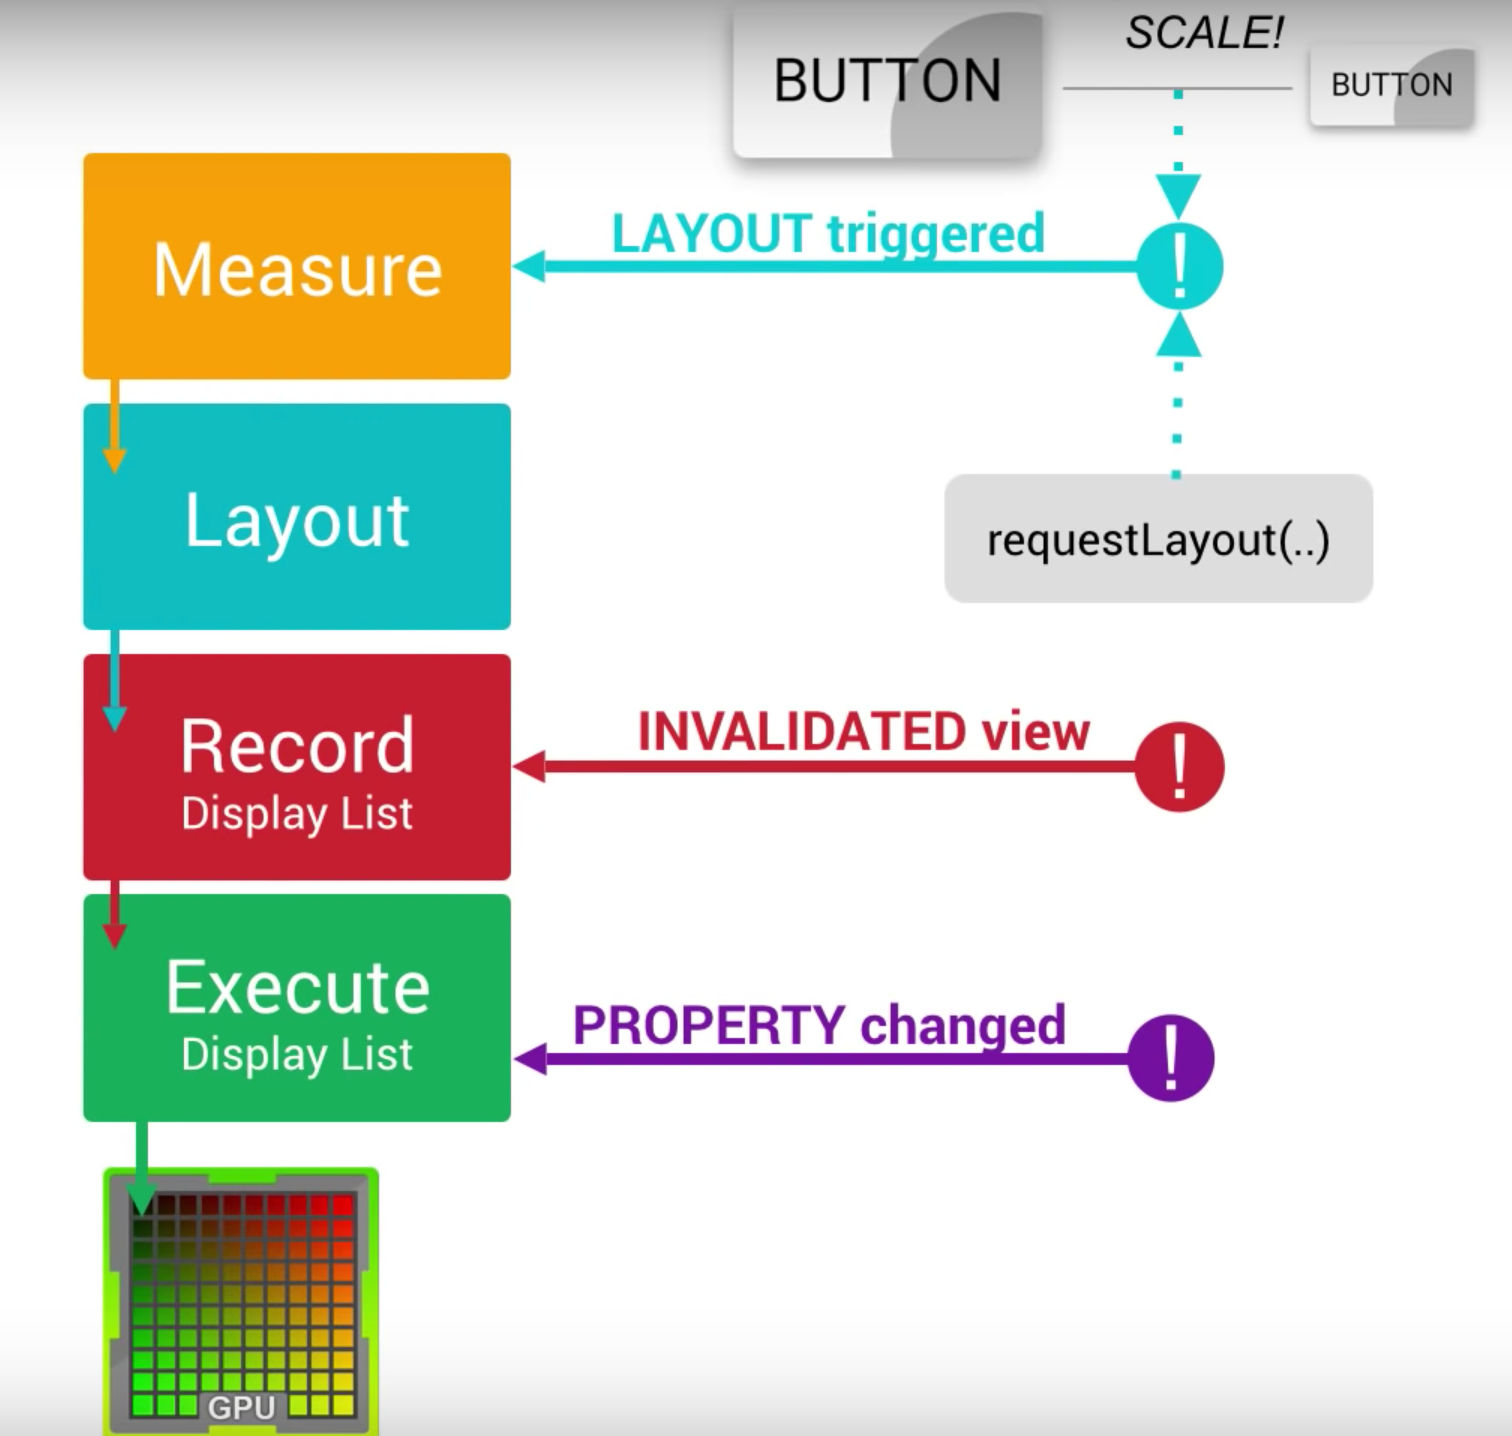
In the future, if there was a change in the property of a view, we simply need to execute that display list one extra time. But in the future, if there was a visual change of the view, then the previous display list is no longer valid — so we need to recreate the display list and execute again to update the screen.
Tip: If at any point the content of the view changes, it repeats the process of recreating and reexecuting the display list. So the performance varies on how complex the view was.
Suppose there was a size change of the view. Then when the measure phase kicks in, it’ll ask every view in the view hierarchy what their new sizes are.And if there was a change in the position of a view, therequestLayout()method gets called. Or if a view group repositions its children, the layout phase gets called and traverses over the entire hierarchy where every child needs to be positioned.
As each phase takes its time as individuals, it may not have a great impact. But in case there are other views or view groups depending on them together, they may have an impact on performance.
Tip : So for better-performing apps, we need to maintain a flat-view hierarchy so dependents won’t get affected resulting in less time for updating a view.
I think you got a basic overview of how the view renders. If you want to know further things like what components are used while rendering, what the display pipeline was, and how the sync happens between UI and hardware, please check out “Android Internals for Rendering a View.”
Performance
As developers, it’s our responsibility to check the performance of the applications we build. UI performance plays a key role in app performance. Now let’s explore overdraw which degrades the UI performance
Overdraw
Overdraw refers to the system’s drawing a pixel on the screen multiple times in a single frame of rendering. It was a performance problem that causes GPU time wastage to render pixels that don’t reflect on what the user sees on the screen.
There are several ways you can follow to reduce overdraw:
- Remove unnecessary backgrounds in layouts
2. Flatten the view hierarchy
3. Reduce Transparency
Remove unnecessary backgrounds in layouts
Usually, we sometimes provide unnecessary backgrounds in our layouts that the user never encounters. So before giving a background, determine once and for all whether the background is necessary or not for that view.
One simple example is sometimes in our layouts we just simply provide the same backgrounds to both child and parent views which isn’t necessarily required as shown below.
<LinearLayout android:id="@+id/parent" android:background=”@android:color/black”>
<android.support.v4.widget.NestedScrollView>
<LinearLayout android:id="@+id/child" android:background=”@android:color/black”>
<! — some stuff here →
</LinearLayout>
</android.support.v4.widget.NestedScrollView>
</LinearLayout>
If both have different backgrounds, then it’s fine to do so.
Flatten the view hierarchy
Maintain a simple view hierarchy. Use ConstraintLayout for the best performance. ConstraintsLayout helps to reduce the nesting of layouts to a great extent with simple constraints. You may be able to improve performance by optimizing your view hierarchy to reduce the number of overlapping UI objects. Avoid unnecessary layouts.
Reduce transparency
Rendering of transparent pixels on screen is known as alpha rendering. Visual effects like transparent animations, fade outs, and drop shadows all involve some sort of transparency and can, therefore, contribute significantly to overdraw. You can improve overdraw in these situations by reducing the number of transparent objects you render.
For example, you can get the grey text by drawing black text in a TextViewwith a translucent alpha value set on it. But you can get the same effect with far better performance by simply drawing the text in grey.